
The 3CX Windows Client – Version 16
Make calls, view the status of colleagues, chat, schedule a video conference and check voicemail from your desktop.
Need to create an ad-hoc web meeting? Simply click on the WebMeeting icon in the bottom menu to open up your WebMeeting room.
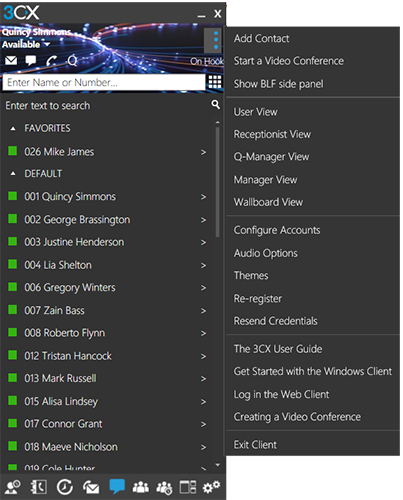
Open the side menu to access useful features such as Queue Manager, Wallboard and Receptionist view for advanced call management, show and hide your BLFs, and configure your settings.
Install the client to get started
Download the latest version of the client. In the setup wizard, accept the License Agreement terms and continue to install.
When installation is complete, you can quickly and easily configure your office extension by going to your 3CX Welcome Email and opening the configuration file attached. Your 3CX Windows Client should display your status as “On Hook”.
And that’s it! You’re ready to start making calls.
Note: The 3CX Windows Client requires V16, Windows 10 only. If you are unsure or run into any problems, contact your administrator.
IP phone or softphone – whatever works for you
You can easily switch between “Softphone” and “CTI” mode from the phone selector beneath your name and status.

Softphone: Allows you to make and receive calls through your PC or laptop without the need for a deskphone
CTI: CTI mode enables you to make and receive calls from the deskphone, as well as control the device through the app. View supported IP phones.
Manage your status
Status is a great way to inform colleagues of your availability and view who is on hand to take your calls.
Simply click on the status selector beneath your name and choose from Available, Away, Do Not Disturb, Lunch, and Business Trip.
Click the arrow next to the status to customize with a message and call forwarding options.
Making a call
The phonebook enables you to effortlessly locate extensions by searching with name, number or email address, or simply enter external numbers via the dialpad. Click call and that’s it!
What’s more, during a call you can seamlessly perform various functions with just a mouse click.
- “Transfer” will transfer the call without the need for you to speak to the receiver, a “Blind Transfer”.
- “Att.transfer” will transfer the call after you first speak to the receiver to see if they accept the call, an “Attended Transfer”.
- “Conference” allows you to create an ad hoc conference call, adding more participants to join the conversation.
- “Rec” allows you to record your conversation.
- “Video” will elevate your call to a video call with the additional option of screen sharing.
Create or Schedule a Video conference
While creating your conference, you can easily choose between two types of video conference: WebMeeting or Webinar.
To change the video conferencing profile in the Windows client:
- Click the “Settings”
button.
- Choose between “WebMeeting Profile” or “Webinar Profile.”
- There are default settings for each profile, but you can adjust them as per your preferences. You can specify:
- Participants Rights: Audio, Video and Chat.
- Meeting options: Allow Participant Control, Everyone is an organizer, Organizer connects first, Hide Names.
- Bandwidth Settings: Meeting Location and Bitrate.
Customize your settings
Personalize your app experience in “Settings” where you can view and change audio and video options, forwarding rules and your app theme. You can also re-register your extension for any changes to take effect and request your “Welcome Email” to be re-sent.
- “Status Configuration”: Configure forwarding rules and exceptions for different statuses.
- “Configure Accounts”: Easily switch between different accounts – useful for hotdesking.
- “Audio Options” & “Video Options”: Select your output and input devices, and configure advanced options.
- “Hot Keys”: View and edit keyboard shortcuts to control your app.
- “Advanced Settings”: Here you can change Behavior (such as bringing the app to front), Language, enable Auto Answer and view Integration options.
- “Themes”: Change your theme or set a custom image.