3CX Quick Start Guide
Using your 3CX Desk Phone
To make a call:
- Dial the number on the keypad and hit the send button.
- OR select a contact or extension from your Web Client or a number from a web page, hit call.
- The Web Client triggers the call on your desk phone if selected via the phone selector toggle.
To transfer a call:
- For blind transfer: Press “Transfer”, dial the extension, press send/dial and hang up.
- Attended transfer Yealink: Press “Transfer”, dial number or select extension, press “Send”, announce the caller, press “Transfer” and hang up.
Connect to Voicemail of extension:
- To leave a message in the voicemail box of a particular Extension: Press “Transfer” , then Dial *4. For example, press ‘Transfer’, then *4100, will leave a voicemail message in the voicemail box of extension 100.
Using Shared Parking:
- By default, there are 2 Shared Parks set up on your system, SP 1 and SP 2. There is a limit of 1 person per Shared Park. If additional Shared Parks are needed, contact your system administrator for setup.
- To use a Shared Park, while on an existing call, simply press an available (GREEN) Shared Park (SP #) button on your phone. The calling party will be placed on HOLD listening to music awaiting pickup.
- To pick up a Shared Park, simply press the occupied SP button (RED) with your calling party on hold from any telephone in the office.
Please NOTE: To answer a Shared Park using your mobile app / web client, simply dial ext001 for SP 1 and ext002 for SP 2. For example, if the receptionist places an inbound call on SP 1 and a mobile app user wishes to pick up, they simply dial 001 or 002 respectively based on which park it is placed in.
Using Do Not Disturb (DND):
- The Do Not Disturb feature allows you to reject all incoming calls. This can be useful when trying to focus on that big project or if you are away from your desk. All calls will automatically be redirected to your extension voicemail.
Using History:
- Your phone provides a record of all incoming / outgoing calls made. By clicking the History button you will have access to the following categories – All Calls / Missed Calls / Placed Calls / Received Calls / Forwarded Calls.
Using 3CX Phonebook / Contact Directory:
3CX has a rich contact directory called 3CX Phonebook. Using 3CX Phonebook, you can add, manage, and access contact information from whatever platform you’re using, desktop or mobile. You can add company-wide contacts or personal contacts.
Here’s how you add a contact to 3CX Phonebook:
- Login to your 3CX Web Client
- Click Contacts on the left menu bar
- Choose Company or Personal Phonebook
- Click the plus-sign (+)
- Enter Contact information
- Click the SAVE button (looks like a floppy disk)
Force 3CX IN or OUT of Office – Emergency Code
Setting 3CX to In Office Hours
If the Administrator dials *641 (appends a 1 to the code), a prompt will be played stating that “3CX is now set to IN OFFICE HOURS”. This means that the PBX will disregard the current time, or day (even if it is a holiday) and set all the routes of the Gateways, VoIP Providers and DID/DDI’s to route to the In Office hours destination.
Setting 3CX to Out of Office Hours
If the Administrator dials *642 (appends a 2 to the code), a prompt will be played stating that “3CX is now set to OUT OF OFFICE HOURS”. This means that the PBX will disregard the current time, or day (even if it is 10am for example) and set all the routes of PSTN Gateways, VoIP Providers and DID/DDI’s to route to the Out of Office hours destination.
For more information, visit Manually Enable / Disable Night Mode!
Voicemail
Setting your Voicemail Greeting:
- By phone:
- Dial “999” or simply press the “MESSAGE” button on your phone
- Enter your PIN and then press “#”.
- Select option “8” and then “0” to record.
- Press “#” to end recording and “0” to save.
- From the web client:
- Go to “Settings” > “Greetings”
- From here you can set a greeting according to your status.
To Playback Voicemail:
- By Phone:
- Dial “999” or hit “Voicemail/Message”
- Enter your PIN, press “#” (if required) and then “*” to play your messages.
- During playback of voicemail, you have these options:
- 0 –Skip to the next message.
- 1 –Skip to the previous message.
- 2 –Repeat current message.
- 3 –Delete the current message and automatically go to the next message.
- 4 –Call Back –this will trigger a call to the caller ID of the person who left the message.
- 5 –Forward message to another extension.
- 9 –To go to the Voice mail options menu.
- # –To hang up the call.
- Web Client: Click on “Voicemail” and click the playback icon to listen to the message on your selected phone.
- Android & iOS App: Tap on the burger menu and select “Voicemail”, tap on the voicemail and select “Play” to listen to the message.
Voicemail Message Prompts:
- To play available voicemails press “*”
- To change profile status press “1”
- Press 1 for Available
- Press 2 for Away
- Press 3 for Out of Office
- Press 4 for Custom Profile 1
- Press 5 for Custom Profile 2
- To dial a number press “3”
- To delete all read messages press “4”
- To change your self-identification message “5”
- To record new self-identification message press “0”
- To delete message press “1”
- Check current self-identification message press “2”
- To exit, press “#”
- To play mailbox information press “6”
- To change voicemail pin number press “7”
- To change your greeting message press “8”
- To repeat the prompt press “9”
Your Communications Dashboard – The 3CX Web Client
| Login to the Web Client – Open the “Your User Account on your New 3CX System” email. – Click the Web Client URL. – Login with Google, MS 365, or use the credentials in the email. Manage your status & queues – Set your status by clicking on your Avatar: 5 options available. – Your status changes to yellow when your line is busy. – Customize status / forwarding rules: “Avatar > Your Name > Status”. | 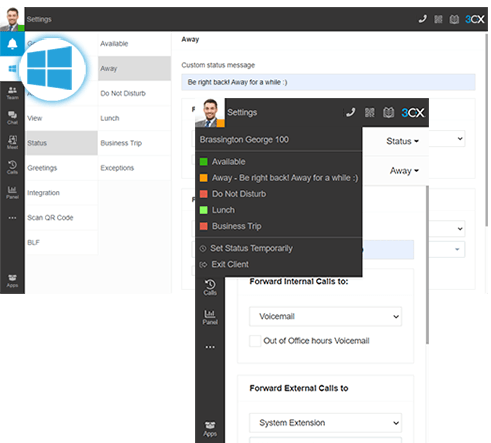 |
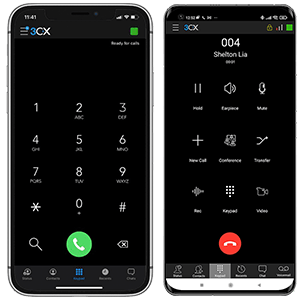
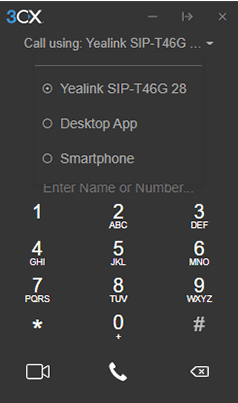 | 1. To call, click on the dial pad in the top right menu or click on the search icon. 2. Enter the phone number or search by name, extension number or email address. 3. Choose your device to place a call – You can seamlessly place calls from your IP phone, the iOS or Android app, Web Client or the Desktop App – wherever you have provisioned your extension. From the phone selector in the web client’s dialer, you can select your preferred device and control calls from the Web Client interface. 4. Click the handset icon to start the call. |
| The “Status” feature allows you to see which colleagues are available to take calls. Avoid distractions and set your own status to let others know when you’re away or you don’t want to be disturbed. Manage your status: – Click your avatar in the top left and choose from Available, Away, Do Not Disturb, Lunch, Business Trip. – Your status changes to yellow when your line is busy. – Click on your avatar to select “Set status temporarily” to time-limit your status. – From this menu you can also login and out of queues. – Use the pencil icon to set a custom status message | 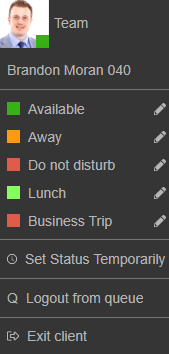 |
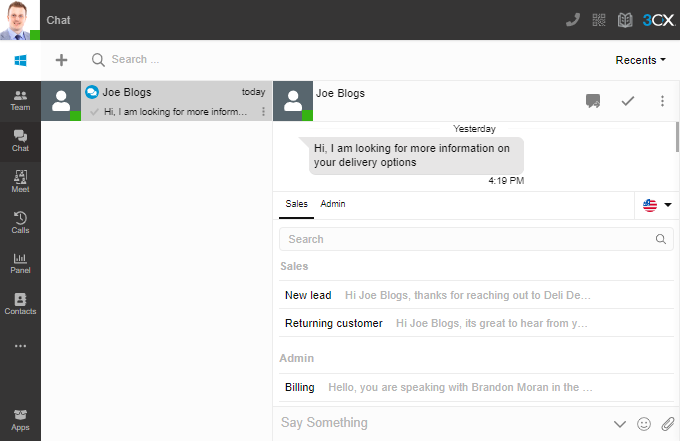 | Chat with colleagues and customers: In the “Web Client > Chat” section, you can send and receive instant messages with colleagues as well as live chat, WhatsApp, Facebook, and SMS/MMS messages from customers. Quick response chat templates are available to be created and edited by group managers. These allow users to respond with predefined messages making response times quicker. Templates can be split into different categories and languages. Find out more about composing chats and SMS, and the various chat functions available in the business chat manual. |
Your Office Anywhere – The 3CX Apps